This post is part of the series WebGL 2 Development with PicoGL.js.
In the last lesson, we rounded out our core rendering toolkit with textures and framebuffers. In this lesson, we’ll look at some new WebGL 2 features that don’t introduce new functionality, but let us draw the things we can already draw much more efficiently. We’ll start with uniform buffers, which allows us to load all our uniforms into a block of memory that stays on the GPU, rather than updating them individually on each draw call. Then we’ll take a look at instanced drawing, which allows us to draw multiple copies of an object in a single draw call.
Uniform Buffers
Those coming from WebGL 1 know that uniforms are variables that remain constant for all vertices and all fragments of a given draw call. In WebGL 1, uniforms would have to be updated individually for every draw call, which could lead to significant CPU overhead. In WebGL 2, we have the option to declare our uniforms in a uniform block backed by a uniform buffer that you just bind to update all uniform values in the block (similarly to how you bind vertex buffers for attributes). To take advantage of uniform buffers, you normally have to carefully lay out your buffers according to the std140 layout specification. Fortunately, PicoGL.js takes care of most of that for us.
Let’s start with the boilerplate page and fill in the vertex shader:
#version 300 es

layout(location=0) in vec4 position;

layout(std140) uniform SceneUniforms {
    mat4 uRotation;
    vec4 uColor;
};

void main() {
    gl_Position = uRotation * position;
}
The main thing to note here is the uniform block, SceneUniforms. Other than wrapping our declarations in the block, we use the uniforms as we normally would. We’re passing a matrix, uRotation, that we use to transform the input position, and uColor, which isn’t used here. On to the fragment shader:
#version 300 es
precision highp float;

layout(std140) uniform SceneUniforms {
    mat4 uRotation;
    vec4 uColor;
};

out vec4 fragColor;
void main() {
    fragColor = uColor;
}
Again, the only new thing is the uniform block. In this case, we’re using uColor to set the color for the fragment. Note that we’re using the same uniform block for both shaders, and despite the fact that we don’t use both uniforms in both shaders, we have to declare all uniforms in the block for both.
We’ve seen all of the application set up before:
var app = PicoGL.createApp(canvas)
.clearColor(0, 0, 0, 1);

var vSource = document.getElementById("vertex-shader").text.trim();
var fSource = document.getElementById("fragment-shader").text.trim();
var program = app.createProgram(vSource, fSource);

var positions = app.createVertexBuffer(PicoGL.FLOAT, 2, new Float32Array([
     -0.2, -0.2,
     0.2, -0.2,
     0.0, 0.2
]));

var triangleArray = app.createVertexArray()
.vertexAttributeBuffer(0, positions);
Note that we’re making the triangle a little smaller than usual, which will come in handy later when we want to draw multiple instances of it. Now we can create our uniform buffer:
var rotationMatrix = mat4.create();
mat4.fromZRotation(rotationMatrix, Math.PI / 12);

var uniformColor = new Float32Array([1.0, 0.0, 1.0, 1.0]);

var uniformBuffer = app.createUniformBuffer([
    PicoGL.FLOAT_MAT4,
    PicoGL.FLOAT_VEC4
])
.set(0, rotationMatrix)
.set(1, uniformColor)
.update();
We use glMatrix to create a matrix that will rotate our triangle about the z-axis by 15 degrees, and also create a float array to represent the color of our triangle. The call to createUniformBuffer() takes an array of GL enums to define the layout, which must match the layout of the uniform block in our shaders. With the layout defined, we can use the set() method to update individual uniforms by referring to their indices in the layout as if they were in an array. These updates all happen in a local cache of the buffer, and the call to update() sends the new values to the GPU.
We then create our draw call, binding our uniform buffer to the uniform block, and draw:
var drawCall = app.createDrawCall(program, triangleArray)
.uniformBlock("SceneUniforms", uniformBuffer);

app.clear();
drawCall.draw();
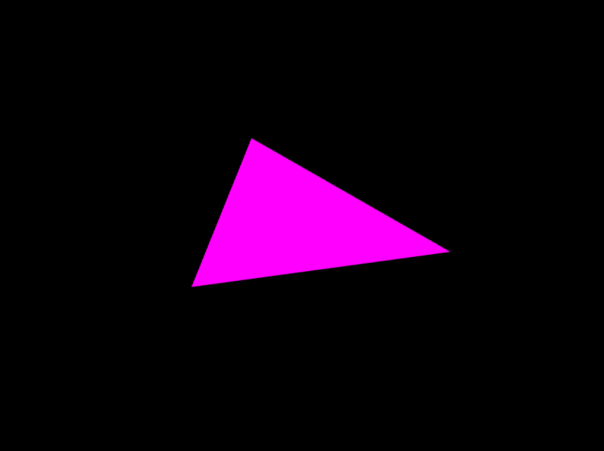
If everything went well, you should see the image from the top of this post.
Instanced Drawing
It’s common when rendering a scene to render the same geometry multiple times while modifying things like the color or transform. WebGL 2 lets us reduce CPU overhead in these situations by drawing these copies in a single draw call. We’ll demonstrate instanced drawing by making a few small changes to the application we’ve been working on. First, the vertex shader:
#version 300 es

layout(location=0) in vec4 position;
layout(location=1) in vec2 iOffset;
layout(location=2) in vec4 iColor;

layout(std140) uniform SceneUniforms {
    mat4 uRotation;
    vec4 uColor;
};

flat out vec4 vColor;
void main() {
    vColor = iColor;
    gl_Position = uRotation * position;
    gl_Position.xy += iOffset;
}
We’ve added two new in variables to our vertex shader, but these will be passed per instance rather than per vertex. We’ll use uOffset to arrange our instances on the screen and uColor to modify the color of each instance. Notice that we’ve declared our out variable, vColor, as flat. This tells the rasterizer not to interpolate values across the triangle surface, since they’re constant per instance.
#version 300 es
precision highp float;

flat in vec4 vColor;

layout(std140) uniform SceneUniforms {
    mat4 uRotation;
    vec4 uColor;
};

out vec4 fragColor;
void main() {
    fragColor = mix(uColor, vColor, 0.5);
}
Our fragment shader doesn’t change much. We take vColor in as input and mix it with the uColor from the uniform block to get the final fragment color. Finally, we set up our instanced geometry:
var positions = app.createVertexBuffer(PicoGL.FLOAT, 2, new Float32Array([
     -0.2, -0.2,
     0.2, -0.2,
     0.0, 0.2
]));

var instanceOffsets = app.createVertexBuffer(PicoGL.FLOAT, 2, new Float32Array([
     -0.4, -0.4,
     0.4, -0.4,
     -0.4, 0.4,
     0.4, 0.4
]));

var instanceColors = app.createVertexBuffer(PicoGL.FLOAT, 3, new Float32Array([
     1.0, 0.0, 0.0,
     0.0, 1.0, 0.0,
     0.0, 0.0, 1.0,
     1.0, 1.0, 0.0
]));

var triangleArray = app.createVertexArray()
.vertexAttributeBuffer(0, positions)
.instanceAttributeBuffer(1, instanceOffsets)
.instanceAttributeBuffer(2, instanceColors);
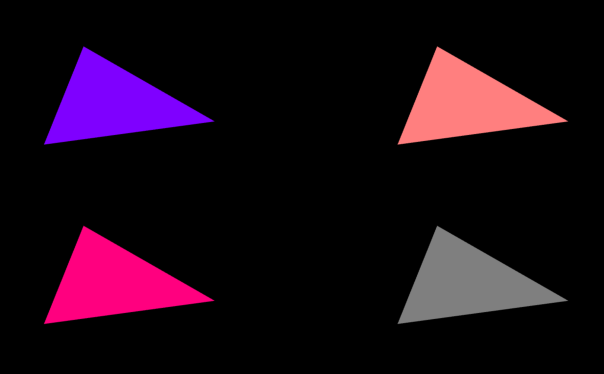
The instanceOffets and instanceColors buffers are created the same way we created our per-vertex buffer. The key thing is calling instanceAttributeBuffer() to bind them to the vertex array, which sets the vertex array up to pass elements from those buffers once per instance rather than once per vertex. If all went well, you should see the image from the beginning of this section. A live version is available here.
The completed example for part 3 is available here. If you have any questions, feel free to post them in the comments, visit the PicoGL.js Gitter chat room, or look me up on Twitter.

2 thoughts on “WebGL 2 Development with PicoGL.js, Part 3: Uniform Buffers and Instanced Drawing”